Why Does My Vinyl Record Sound Bad? 10 Common Causes & Fixes
Introduction
You put on a record you know well, lower the stylus, and wait for that familiar analog sound.
Instead, something feels wrong.
The vocals sound harsh. The cymbals are fuzzy. The whole record sounds muffled or strangely thin. Maybe there's too much crackle, the needle skips, the music plays too fast, or the last song on the side suddenly sounds distorted.
And if you're new to vinyl, the obvious question is:
Why does my vinyl record sound bad?
The good news is that a bad-sounding record does not automatically mean you have a bad turntable—or that vinyl itself is supposed to sound noisy, dull, or distorted.
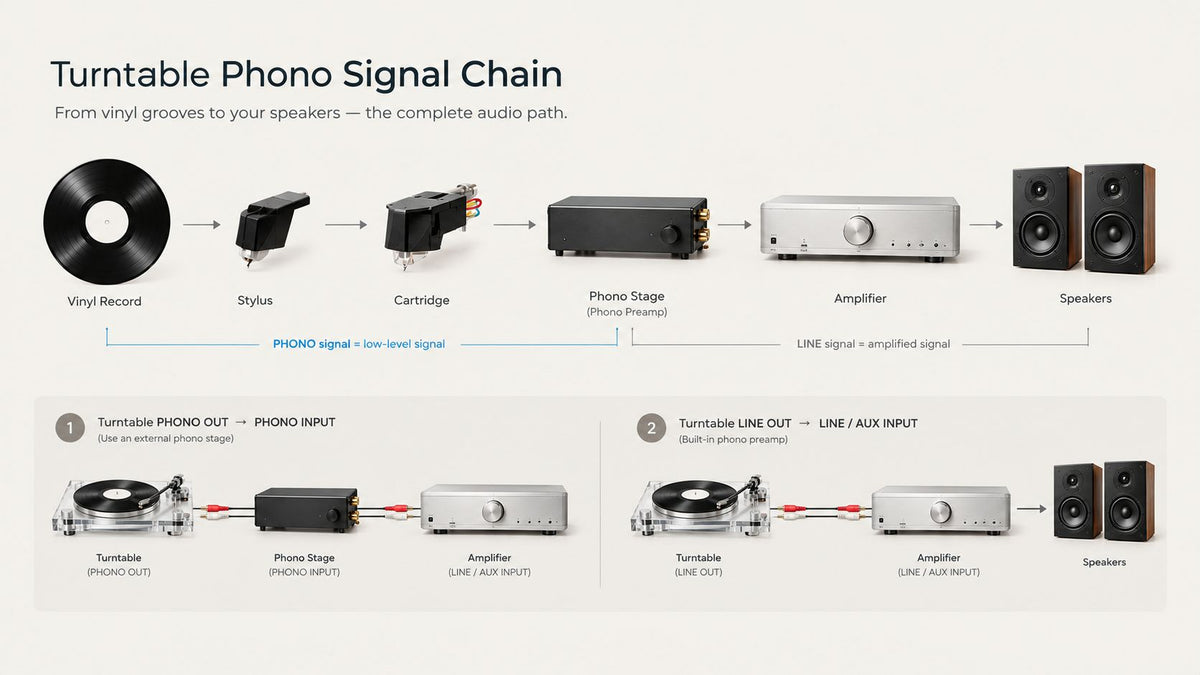
Vinyl playback is a physical process. A stylus has to trace a microscopic groove while the record rotates at the correct speed. The cartridge converts that movement into an electrical signal, which is then processed through your turntable's output system and connected audio equipment. Depending on the setup, that may include a built-in or external phono preamp, amplifier, Bluetooth connection, and speakers.
If something is dirty, misaligned, incorrectly adjusted, damaged, or connected the wrong way, the problem can become audible.
Sometimes the record really is the problem. Other times, the issue is the stylus, tracking force, cartridge alignment, turntable placement, speed, or audio connection.
The trick is knowing which symptom points to which part of the system.
In this guide, we'll walk through the 10 most common causes of poor vinyl sound quality, explain what each problem sounds like, show you what to check first, and help you decide whether you need to clean something, adjust your setup, inspect a component, contact support, or simply replace a problematic record.
Before buying an upgrade, start with diagnosis. In many cases, the best improvement costs nothing.
First: What Does "Bad" Vinyl Sound Like?
Before changing anything, pay attention to the exact symptom.
"Bad sound" is too broad to be useful. A record that sounds muffled has a different likely cause from one that sounds harsh, while a record that becomes distorted near the center of the side points toward a different problem again.
Here's a quick starting point:
| What you hear | What to check first |
|---|---|
| Muffled or dull sound | Dirty stylus, dirty record, cartridge/setup, or record condition |
| Harsh or fuzzy vocals | Tracking force, stylus condition, or cartridge alignment |
| Distortion near the center | Inner-groove distortion, alignment, or stylus condition |
| Pops and crackles | Dust, static, scratches, or groove damage |
| Thin or very quiet sound | Incorrect PHONO/LINE setting, incompatible connection, or missing phono preamp |
| Very loud, overloaded, or harsh sound | Incorrect PHONO/LINE setting or two phono stages in the signal path |
| Skipping | Tracking force, anti-skate, level, dust, vibration, or a warped record |
| Music sounds too fast or slow | Incorrect speed setting or a speed-control issue |
| Low-frequency rumble or feedback | Vibration, speaker placement, or turntable support |
| One channel sounds weak | RCA connection, cable, cartridge connection, input settings, or alignment |
| Only one record sounds bad | Record condition, pressing, warping, or groove damage |
| Several records sound bad | Stylus, tracking, tonearm, turntable, or audio setup |
One of the most useful clues is whether the problem happens with one record or several.
If one record sounds bad while other records play normally, the record itself becomes a much stronger suspect. If several clean records have the same problem, look more closely at the stylus, turntable setup, connections, or audio system.
Don't try to fix five things at once.
If you're still not sure what's causing the problem, start with a simple troubleshooting guide: change one variable at a time and see whether the problem follows the record or the playback system.
1. Your Record Is Dirty
Why dirty vinyl sounds bad
One of the simplest explanations for poor vinyl sound is also one of the easiest to overlook: dust and debris on the record surface and inside the grooves.
A record groove is extremely small. As the stylus travels through it, dust and other particles can interfere with clean tracking. You may hear more ticks, pops, crackling, or general surface noise.
A dirty record can also transfer debris to the stylus, which can affect playback beyond that one record.
The result can become a frustrating cycle:
Dirty record → contaminated stylus → poorer tracking → worse sound.
If a record sounds noticeably noisier than others in your collection, cleaning it is one of the first things worth trying.
What dirty vinyl usually sounds like
Common signs include:
-
Random pops and ticks
-
Crackling throughout a side
-
Increased surface noise
-
Occasional distortion or roughness
-
Noise that becomes more noticeable during playback
-
A record that sounds better after proper cleaning
But there's an important distinction:
If the same noise occurs at exactly the same point every time, don't automatically assume it's dust.
A repeating click, pop, or burst of distortion may be caused by a scratch, groove damage, a pressing defect, or another permanent problem with the record.
What to do
Start with a cleaning method specifically designed for vinyl records.
For everyday record care:
-
Handle records by the edges and labeled center area.
-
Avoid touching the playing surface with your fingers.
-
Remove loose dust before playback.
-
Use a record-cleaning product or method designed for vinyl.
-
If you wet-clean a record, follow the cleaning product's instructions and allow the record to dry completely before playing it.
-
Store clean records in suitable inner sleeves and keep them away from unnecessary dust and debris.
Avoid improvising with household cleaners simply because they are already under the kitchen sink. Some cleaning products can leave residue or may not be suitable for vinyl.
The goal is simple: remove contamination without introducing another problem.
A useful test
If one record sounds noisy but several other records play normally, test another record before changing your turntable settings.
If the other records sound clean, the original record becomes a much stronger suspect.
If several clean records have the same problem, the record itself is less likely to be the cause. That's when it's worth checking the stylus, tracking setup, turntable, connections, or speakers.
This simple comparison can save you from "fixing" a turntable that wasn't actually broken.

2. Your Stylus Is Dirty, Worn, or Damaged
The stylus is the part of the cartridge that physically traces the record groove.
Because it makes direct contact with the groove as the record spins, its condition has a major influence on both sound quality and record wear.
A stylus problem can be easy to miss because the stylus itself is tiny. But if it becomes dirty, worn, or damaged, the change in sound can be surprisingly noticeable.
A dirty stylus can make vinyl sound muffled or distorted
Dust and debris can collect around the stylus during normal playback. That buildup can interfere with accurate groove tracking and reduce clarity.
You may notice:
-
Muffled or dull high frequencies
-
Reduced detail and clarity
-
Distortion, especially on louder passages
-
Harsh or fuzzy vocals
-
Increased surface noise
-
More frequent skipping
If your records were playing normally and the sound suddenly becomes dull or distorted, check the stylus before making major changes to your turntable setup.
A dirty stylus is often much easier to fix than an incorrectly adjusted turntable.
A worn stylus is a different problem
Unlike dust, stylus wear develops gradually.
How quickly a stylus wears depends on several factors, including:
-
Total playing time
-
Stylus and cartridge design
-
Record cleanliness
-
Tracking force
-
Cartridge alignment, where applicable
-
General maintenance and handling
There is no single replacement interval that applies perfectly to every stylus.
Instead, follow the manufacturer's guidance for your specific cartridge or stylus and pay attention to changes in playback. A gradual increase in distortion, loss of high-frequency detail, increased surface noise, or a general loss of clarity can all be signs that the stylus needs closer inspection.
A visibly bent, chipped, or otherwise damaged stylus should not be treated as "probably fine."
Can a bad stylus damage records?
Yes.
A worn or damaged stylus may not track the groove correctly. More importantly, mistracking can cause the stylus to lose contact with the intended groove path and make abnormal contact with the record surface.
The Library of Congress notes that mistracking can seriously damage records, particularly softer recording materials such as vinyl, lacquer, and wax.
That's why a suspected damaged stylus is not just a sound-quality issue. It can also become a record-care issue.
If you suspect the stylus is damaged, stop playback until you have confirmed its condition or had it inspected.
How to clean a stylus safely
The stylus and cantilever are delicate, so cleaning should always be gentle.
Use a cleaning method specifically intended for your stylus and follow the manufacturer's instructions.
As a general rule:
-
Never touch the stylus with your fingers.
-
Do not press hard against the stylus or cantilever.
-
Use a suitable stylus brush rather than improvised tools.
-
Brush only in the direction recommended by the manufacturer.
-
Avoid applying liquids or solvents unless the stylus manufacturer specifically says they are safe.
For example, Ortofon recommends a dry stylus brush and advises against solvents or fluids that could damage the stylus assembly or cartridge.
The goal is not to scrub the stylus clean. It's to remove loose debris without putting mechanical stress on one of the most delicate parts of your turntable.
A useful test
If your records suddenly sound dull, distorted, or unusually harsh, compare the sound with a record you know normally plays well.
Then inspect the stylus carefully.
If several clean records have developed the same problem, the stylus becomes a much stronger suspect. If only one record sounds bad while others play normally, check the record itself before assuming the stylus needs replacing.
And if the stylus appears damaged, don't keep playing records just to "see if it gets better." A questionable stylus is one of the few turntable problems where stopping playback can be the safer choice for both your records and your equipment.

3. Your Tracking Force Is Wrong
What is tracking force?
Tracking force is the downward force the cartridge applies through the stylus as it tracks the record groove.
It needs to be high enough to keep the stylus properly seated in the groove, while remaining within the range specified for the cartridge.
For turntables with an adjustable tonearm, tracking force is one of the most important setup adjustments because getting it wrong can affect both sound quality and tracking performance.
Too little tracking force
If the tracking force is set too low, the stylus may not maintain stable contact with the groove, particularly during louder or more demanding passages.
You may notice:
-
Distortion
-
Fuzzy or rough-sounding vocals
-
Sibilance
-
Skipping
-
Harsh high frequencies
-
Poor tracking during louder passages
The important point is that lighter does not automatically mean safer.
A stylus that is not tracking the groove reliably can behave unpredictably and may create more problems than a correctly set tracking force.
Too much tracking force
Too much tracking force is also undesirable.
If the setting exceeds the cartridge manufacturer's specified range, it can change the cartridge's intended tracking behavior and contribute to unnecessary wear.
That doesn't mean a small difference automatically damages a record. The important thing is to keep the tracking force within the manufacturer's specified range and, where provided, use the recommended tracking force for the cartridge.
Ortofon, for example, distinguishes between a cartridge's recommended tracking force and its broader acceptable tracking-force range. The correct setting therefore depends on the specific cartridge rather than on a universal number.
How to fix it
Don't guess.
Start with the tracking-force specification for your specific cartridge and turntable.
If your turntable uses an adjustable counterweight:
-
Follow the manufacturer's tonearm setup procedure.
-
Balance the tonearm as instructed.
-
Set the tracking force to the specified value.
-
Set anti-skate according to the manufacturer's guidance, if applicable.
-
Test the turntable with a record you know normally plays well.
If your turntable uses a factory-set tracking force, don't change it simply because another cartridge or turntable uses a different number.
There is no universal "best" tracking force for every cartridge.
This is particularly important for beginners. Copying a tracking-force setting from an internet forum may create a new problem because two cartridges can have completely different specifications.
AUDURA setup note
If your AUDURA turntable has adjustable tracking force, use the tracking-force specification provided for your specific model and cartridge.
If your AUDURA turntable is designed with a factory-set tracking force, don't try to apply a generic tracking-force number from another turntable or cartridge.
When in doubt, use the manufacturer-recommended specification, and if you need help understanding the setting, see our guide to tracking force and anti-skate.
A useful test
If your turntable is producing distortion, harsh vocals, or skipping across multiple records, and the problem isn't explained by a dirty stylus or damaged records, tracking force is worth checking on models that allow adjustment.
Make one adjustment at a time and test again.
If changing the tracking force does not improve the problem, don't keep increasing or decreasing it. Return to the manufacturer's specified setting and investigate the other possible causes.
4. Anti-Skate Is Incorrect
What is anti-skate?
On a conventional pivoted tonearm, the stylus experiences a sideways force that tends to pull the tonearm toward the center of the record as it tracks the groove.
This is commonly called skating force.
Anti-skate applies a counteracting force to help the stylus track the groove more evenly across both groove walls.
In a properly adjusted system, anti-skate is intended to support stable, balanced tracking rather than change the overall character of the sound.
What happens when anti-skate is wrong?
Incorrect anti-skate can contribute to problems such as:
-
Channel imbalance
-
Uneven distortion between the two channels
-
Increased distortion during louder passages
-
Unstable or inconsistent tracking
-
Occasional skipping in some situations
You may notice that one channel sounds less clean than the other, particularly during louder or more demanding passages.
However, these symptoms can have several other causes. Cartridge alignment, tracking force, stylus condition, record damage, and even the record itself can produce similar problems.
That's why anti-skate should not be the first adjustment you make whenever a record sounds distorted.
Should anti-skate equal tracking force?
You'll often see advice that says:
Tracking force = anti-skate setting.
This can be a useful starting point on some turntables, but it should not be treated as a universal rule.
The correct anti-skate setting depends on the design of the tonearm, cartridge, stylus, and the manufacturer's setup recommendations.
Follow your turntable and cartridge instructions first.
If your turntable has a factory-set anti-skate system, don't assume you need to modify it manually. Some designs do not provide a user adjustment at all.
Don't keep turning the dial
A common beginner mistake is repeatedly changing anti-skate because a record still doesn't sound perfect.
Before adjusting it again, check the basics:
-
Tracking force
-
Stylus condition
-
Record cleanliness
-
Cartridge alignment, where applicable
-
Turntable level and stability
-
Record condition
If those checks don't point to the problem, then anti-skate may be worth investigating on a turntable that provides an adjustment.
The goal is not to find a magic anti-skate setting that makes every record sound better.
The goal is to set it correctly for your particular tonearm and cartridge, then leave it alone unless the manufacturer's setup procedure or a specific tracking problem gives you a reason to change it.
AUDURA setup note
If your AUDURA model provides adjustable anti-skate, use the setup instructions for that specific model rather than assuming the anti-skate number should always match the tracking-force number.
If your model uses a factory-set or non-adjustable system, there is nothing for you to adjust.
When troubleshooting distorted or uneven playback, check the simpler variables first—especially the stylus, tracking force, record condition, and connections—before repeatedly changing anti-skate.
5. Your Cartridge Alignment Is Off
Cartridge alignment is one of the more technical parts of turntable setup, but it becomes especially important when distortion becomes more noticeable as the stylus moves toward the center of a record.
Why alignment matters
A record groove is not simply a circular trench.
As the tonearm moves across the record, the stylus needs to maintain the appropriate geometric relationship with the groove. Cartridge alignment determines how the stylus is positioned relative to the tonearm and record.
If a cartridge is incorrectly positioned, the stylus may not track the groove as accurately as it should.
The resulting distortion can be subtle on the outer tracks but become much more noticeable closer to the label, where tracking geometry becomes more demanding.
Common symptoms
You may notice:
-
Vocal sibilance
-
Harsh or fuzzy cymbals
-
Distortion on loud passages
-
Fuzzy or rough-sounding vocals
-
One channel sounding less clean than the other
-
Distortion that becomes more noticeable as the side progresses
This is particularly worth investigating if the problem is consistently worse toward the inner grooves.
However, don't assume that inner-groove distortion automatically means the cartridge is misaligned.
Stylus condition, stylus profile, tracking force, the record's pressing or mastering, and other setup factors can produce similar symptoms.
If the cartridge was recently installed, replaced, or repositioned, alignment should move higher on your troubleshooting list.
Don't use a random alignment measurement
Different tonearms and cartridge setups can use different alignment geometries.
That's why you shouldn't assume that moving the cartridge a fixed number of millimeters—or copying an alignment measurement from another turntable—will automatically solve the problem.
Use the alignment method and geometry specified for your particular tonearm and cartridge.
If your turntable uses a fixed cartridge or a factory-aligned cartridge that isn't designed for user adjustment, don't move it simply because you are experiencing distortion.
If you're not comfortable checking cartridge alignment yourself, having a knowledgeable dealer or technician inspect the setup can be a better option than experimenting with the cartridge mounting.
Beginner order: clean the record, inspect the stylus, verify tracking force and turntable stability, determine whether the problem affects one record or several, and then check the turntable setup if alignment is adjustable and the symptoms point to a setup issue.
A beginner-friendly rule
If your turntable came with a properly installed cartridge and has never been modified, don't immediately start moving the cartridge.
Check the simpler possibilities first:
-
Is the record clean?
-
Is the stylus clean and in good condition?
-
Is the tracking force correctly set?
-
Is the turntable level and stable?
-
Does the same problem occur on other records?
If those checks point toward an alignment problem—and especially if the cartridge was recently installed or repositioned—then cartridge alignment deserves closer attention.
If you're hearing distortion mainly on the inner tracks, remember that the goal isn't to keep adjusting the cartridge until the problem disappears.
The goal is to use the correct alignment geometry for your specific tonearm and cartridge.
6. The Last Song Sounds Worse: Inner-Groove Distortion
This is one of the most recognizable vinyl-specific playback problems.
The first track sounds excellent.
Then, as the record moves toward the center, things start to change.
Vocals become gritty. Cymbals sound splashy or harsh. Sibilants become exaggerated. The closer the music gets to the label, the more noticeable the distortion becomes.
That's often inner-groove distortion, or IGD.
Why does inner-groove distortion happen?
A record rotates at a constant angular speed.
But the linear speed of the groove changes depending on where the stylus is playing.
Near the outside edge of the record, the groove travels through a greater physical distance with each revolution. Closer to the center, the groove travels a shorter distance per revolution.
As a result, the stylus has less linear groove distance available to reproduce the same amount of musical information.
This becomes particularly challenging for high-frequency and high-energy passages, which require the stylus to track rapid changes in the groove accurately.
That is one reason distortion can become more noticeable toward the end of a record side.
Longer sides can make the challenge more pronounced because more music has to fit into the available playing time. Shorter sides generally provide more physical space for each minute of music.
Is inner-groove distortion normal?
Some reduction in tracking margin toward the center of a record is an inherent characteristic of the format.
But obvious distortion on every record is not something you should simply accept as "that's vinyl."
Your setup still matters.
A poorly aligned cartridge, worn or damaged stylus, incorrect tracking force, or a stylus profile that is not properly aligned can make inner-groove distortion much more noticeable.
The record itself can also be a factor. The cutting, mastering, pressing, or condition of a particular record may contribute to distortion that you won't hear on other records.
The easiest diagnostic test
Try three clean records that normally sound good.
For each one, pay attention to the final track or the tracks closest to the center.
Ask yourself:
Does the distortion happen in a similar way on every record?
If several records develop similar distortion near the center, investigate your turntable setup—particularly stylus condition, tracking force, and cartridge alignment where applicable.
If only one record does it, the record itself becomes a stronger suspect.
And if another copy of the same album plays cleanly, you've learned something important:
The problem may not be your turntable at all.
How to tell IGD from a damaged record
A useful clue is consistency.
If distortion gradually becomes more noticeable as the stylus moves toward the center on multiple records, IGD or a setup-related tracking problem becomes more likely.
If a particular burst of distortion, harshness, or noise occurs at exactly the same point on only one record, look more closely at the record itself.
The issue could be:
-
Groove damage
-
A pressing defect
-
A problem with the original mastering or cutting
-
A damaged or worn record
-
A particularly demanding inner-track recording
This is why comparing multiple records is more useful than immediately changing a setup adjustment.
Why stylus shape matters
Different stylus profiles have different contact geometries with the groove.
A conical stylus can be relatively forgiving in some setups, while more advanced profiles can provide more precise groove contact when correctly aligned.
However, a more advanced stylus profile does not automatically eliminate inner-groove distortion.
It can also make correct cartridge alignment and setup more important.
The goal isn't to buy the most expensive stylus available.
It's to use a stylus that is appropriate for the cartridge, tonearm, and setup—and to make sure it is correctly aligned and maintained.
A useful rule of thumb
If every record sounds worse near the center, investigate the turntable setup.
If one record sounds worse near the center, investigate the record.
If another copy of the same record sounds clean, don't start adjusting your turntable just yet.
That simple distinction can prevent unnecessary changes to an otherwise correctly set-up system.

7. Your Turntable Is Playing at the Wrong Speed
Sometimes a vinyl record sounds "bad" simply because it isn't playing at the correct speed.
This can be surprisingly easy to overlook because the rest of the system may sound perfectly clean.
The key is to distinguish between two different problems:
-
Wrong speed: the turntable is running at the wrong RPM.
-
Unstable speed: the turntable is fluctuating around the correct RPM, causing the pitch to move or waver.
What incorrect speed sounds like
If the record is playing too fast:
-
Vocals sound higher
-
Music feels rushed
-
The overall pitch is too high
If it's playing too slowly:
-
Vocals sound lower
-
Music feels sluggish
-
The overall pitch is too low
If the platter speed is fluctuating rather than simply being too fast or too slow, you may hear unstable pitch, sometimes described as wavering or "warbling."
Check the obvious first
Start by making sure the correct speed is selected for the record.
The two speeds most home listeners encounter are:
-
33⅓ RPM
-
45 RPM
Some records use other speeds, but don't assume that every record should be played at 33⅓ RPM.
A classic example is a 45 RPM record played at 33⅓ RPM. The music will sound noticeably slower and lower in pitch.
Before changing any hardware settings, check the record label or sleeve and confirm the intended playback speed.
AUDURA's setup guidance also recommends checking the selected speed before playback. If your specific AUDURA model has a speed selector or control, use the instructions provided for that model.
A useful test
Try a different record that you know normally plays at the same speed.
If one record sounds too fast or too slow but another record plays normally, check the record itself and confirm its intended RPM before adjusting the turntable.
If multiple records have the same speed problem, then the turntable becomes a stronger suspect.
This simple test helps separate a record-specific issue from a turntable speed problem.
If the speed is correct but still sounds wrong
If you've confirmed that the correct RPM is selected, check the turntable according to its design.
On a belt-drive turntable, possible areas to inspect include:
-
Belt installation
-
Belt condition
-
Platter installation
-
Speed-control settings
-
Motor and platter behavior
A worn or incorrectly installed belt can contribute to speed problems, but don't replace the belt immediately just because someone online suggested it.
First establish whether the symptom is actually a speed problem.
On some turntables, speed is electronically controlled, while others use different mechanical or motor arrangements. Follow the troubleshooting and maintenance instructions for your specific model rather than applying a belt-drive fix to every turntable.
When to investigate further
If the correct speed is selected but several records consistently sound too fast, too slow, or unstable, the problem may require a closer inspection of the turntable's speed-control system.
At that point, avoid repeatedly changing settings without knowing what they control.
Confirm the symptom first, then troubleshoot the mechanism responsible for speed.
8. The Phono/Line Connection Is Wrong
A turntable can be mechanically perfect and still sound surprisingly bad if its audio output is connected to the wrong type of input.
This is one of the most common causes of sound that is too thin, too quiet, excessively loud, or unexpectedly distorted.
Why vinyl needs a phono stage
The signal produced by a phono cartridge is very low level and requires additional processing before it can be treated like a normal line-level audio source.
A phono stage, also called a phono preamp, does two important things:
-
It boosts the very low-level phono signal.
-
It applies the required RIAA equalization to restore the intended tonal balance of the recording.
Some turntables have a phono preamp built in.
Others require an external phono stage or an amplifier/receiver with a dedicated PHONO input.
The thin-and-quiet symptom
If your record sounds:
-
Extremely quiet
-
Thin or weak
-
Lacking bass
-
Difficult to hear even when you turn the volume up
check whether the turntable is connected to an appropriate phono stage.
A typical setup without a built-in phono preamp is:
Turntable → Phono stage → Amplifier or powered speakers
If your turntable has a switchable built-in phono preamp and it is set to LINE, a typical connection is:
Turntable LINE output → AUX/LINE input
The important thing is that the signal should pass through one appropriate phono stage before reaching a normal line-level input.
The opposite problem: everything sounds loud and harsh
The reverse mistake can also happen.
If a turntable's built-in phono preamp is already active and you connect its LINE output to a dedicated PHONO input, the signal may pass through two phono stages.
This can result in sound that is:
-
Excessively loud
-
Overloaded or distorted
-
Harsh
-
Tonally unnatural
In other words, the problem isn't necessarily the record or the turntable.
The problem may simply be that the signal is being processed twice.
PHONO vs. LINE: what should you use?
A simple rule is:
PHONO output → PHONO input
or
LINE output → AUX/LINE input
Don't combine the two unless the equipment manufacturer specifically says that the configuration is supported.
If you're using powered speakers, the appropriate input will normally be a line-level input, but always follow the connection instructions for your specific turntable and speakers.
Before buying anything
Trace the entire signal path from the turntable to the speakers.
Ask:
-
Does my turntable have a built-in phono preamp?
-
Is its output currently set to PHONO or LINE?
-
Does my amplifier or receiver have a dedicated PHONO input?
-
If I'm using powered speakers, am I connecting to the correct line-level input?
-
Is another device in the signal path already providing phono-stage functionality?
-
Are the cables connected to the inputs and outputs specified by the equipment manufacturer?
AUDURA's setup guidance similarly recommends checking the specific model's phono-stage and connection configuration before adding external equipment.
A useful test
If the sound is extremely thin and quiet, check the PHONO/LINE configuration before changing tracking force, cartridge alignment, or other turntable settings.
If the sound is suddenly very loud, harsh, or distorted, check for the opposite problem: a LINE-level output being connected to a PHONO input, or two phono stages being used in the same signal path.
In many cases, the fix is simply changing one connection or switch.
Don't buy a new phono preamp until you've traced the signal path first.

9. Your Turntable Is Picking Up Vibration
You can have a clean record, a good stylus, and a correctly set up cartridge and still get poor sound if your turntable is exposed to too much vibration.
Because the stylus reads extremely small movements in the record groove, unwanted movement from the turntable, furniture, speakers, or room can become audible during playback.
Why turntable placement matters
A turntable is designed to respond to tiny physical movements in the record groove.
That also means unwanted vibration can interfere with playback.
Common sources include:
-
Speakers and subwoofers
-
Unstable or resonant furniture
-
Footsteps and floor movement
-
Shelves that flex or vibrate
-
Heavy objects vibrating nearby
-
High playback volume, especially with speakers close to the turntable
At moderate volume, you may notice very little. As the volume increases, however, vibration and acoustic coupling can become much more obvious.
What vibration and acoustic feedback can sound like
Depending on the setup, you may hear:
-
Low-frequency rumble
-
Boomy or muddy bass
-
Bass that becomes exaggerated at higher volume
-
Howling or a low-frequency feedback sound
-
Sound that changes when speakers or the listening environment change
-
Increased noise that is not present on the same record at lower volume
If the problem becomes dramatically worse as you turn up the volume, especially when speakers are close to the turntable, vibration or acoustic feedback should move higher on your troubleshooting list.
The key distinction is between ordinary mechanical vibration and turntable feedback and vibration.
The apartment problem
This is especially relevant for apartment listeners or anyone using a turntable in a shared living space.
You don't need a dedicated listening room to enjoy vinyl. But you do need to give the turntable a reasonably stable place to operate.
When possible:
-
Keep the turntable on a stable, level surface.
-
Avoid placing it directly on a piece of furniture that moves or resonates easily.
-
Keep speakers and subwoofers separated from the turntable.
-
Avoid placing powerful speakers on the same furniture or support surface as the turntable.
-
If footsteps or floor movement are a problem, consider whether a different location or more stable support would help.
A stable surface and sensible speaker placement are usually better starting points than immediately buying elaborate isolation accessories.
AUDURA's setup guidance similarly recommends a stable, level surface and avoiding strong vibration. Its setup and product guidance also emphasizes giving the turntable and speakers sensible positions within the listening space.
A simple test
Before changing your cartridge or buying isolation accessories, try a few simple checks.
-
Play a familiar record at a moderate volume.
-
Lower the volume and listen for changes in low-frequency rumble or boominess.
-
If possible, move the speakers farther away from the turntable.
-
Check whether the turntable is sitting on a stable, level surface.
-
Change one variable at a time and listen again.
If the problem changes significantly when volume, speaker position, or turntable support changes, vibration is a much stronger suspect.
If the same distortion occurs at all volumes and on multiple records, vibration may not be the main cause. Return to the simpler checks: record condition, stylus, tracking force, alignment, speed, and connections.
The goal is not to isolate the turntable with the most expensive accessory. The goal is to give it a stable environment with as little unwanted vibration as practical.

10. The Record Itself May Be Damaged, Worn, or Poorly Pressed
Sometimes your turntable really isn't the problem.
A record can have playback problems because of its own condition or how it was manufactured. This is especially common with older or heavily played used vinyl, but even a brand-new record can occasionally have a pressing or manufacturing defect.
Possible causes include:
-
Scratches or surface damage
-
Groove wear from previous playback
-
Warping
-
Pressing defects
-
Residue or contamination from manufacturing or handling
-
Damage caused by previous playback
-
Cutting or mastering choices that make certain passages harder to track
How to tell if the record is the problem
The simplest test is comparison.
Play several records that you know are clean and in good condition.
If four records sound normal but one consistently sounds distorted, noisy, or otherwise wrong, the problem record becomes a much stronger suspect.
Look for clues such as:
-
A visible scratch or surface mark
-
A click or pop that repeats at exactly the same point
-
A noticeable warp
-
Visible signs of wear or damage
-
Distortion that occurs at the exact same musical moment every time
-
A problem that remains after the record has been properly cleaned
A repeating noise is particularly useful evidence. Dust and other temporary contamination can come and go, but damage or a pressing defect will often produce the same problem in the same place on every playback.
The "one-record" rule of thumb
If one record sounds bad while several other records sound good, don't immediately start changing your turntable settings.
Inspect and test the record first.
This is particularly important with used vinyl. A record can look perfectly acceptable under normal room lighting and still have groove wear from years of playback, especially if it was previously played with an incorrectly adjusted or worn stylus.
If possible, compare the same record with another copy.
For example, if one copy of an album sounds distorted during a particular passage but another copy plays that passage cleanly on the same setup, the evidence points much more strongly toward the original record.
Pressing defects are real
A brand-new record is not automatically a perfect record.
Occasionally, a pressing can have a manufacturing defect or a problem that becomes audible during playback. Some records may also have cutting or mastering characteristics that make particular passages more difficult to track.
If the same musical passage sounds wrong every time, and cleaning the record does not change the problem, consider the possibility that the record itself is responsible.
Before changing your turntable setup, try:
-
Cleaning the record properly.
-
Playing another known-good record.
-
Playing the suspect record again to see whether the problem repeats at exactly the same point.
-
If possible, comparing another copy of the same record.
-
If available, testing the record on another correctly configured turntable.
The more consistently the problem follows the record rather than the playback system, the stronger the case that the record is the cause.
Don't confuse a difficult record with a broken turntable
Some records are simply more demanding to reproduce than others. Long sides, dense musical passages, strong high-frequency content, or inner-groove material can place greater demands on tracking.
That does not automatically mean the pressing is defective—or that your turntable is defective.
The useful question is:
Does the problem follow the record, or does it follow the turntable?
If several different records show the same symptom, continue troubleshooting the playback system.
If one particular record consistently produces the same problem while other records sound good, the record itself deserves much more attention.
Before rebuilding your setup or buying an upgrade, make sure the problem isn't sitting in the record sleeve.
What If Your Vinyl Sounds Muffled or Harsh?
“Muffled” and “harsh” are two of the most common ways people describe vinyl that doesn't sound right.
But these descriptions can point to very different problems.
Before changing your cartridge, buying a new turntable, or adding equipment, identify when the problem happens and whether it affects one record or several.
What If Your Vinyl Sounds Muffled?
Vinyl can sound smooth, full, and warm without sounding dull.
The important distinction is between warmth and loss of clarity.
If vocals, cymbals, and other high-frequency details suddenly sound less clear than they normally do, start with the simplest possibilities.
Check these in order
1. Check the stylus
Is the stylus dirty? Does it appear damaged? Did the sound become dull or unclear recently?
A contaminated or worn stylus can reduce high-frequency detail and make records sound muffled or distorted.
2. Check the record
Is the record dusty or dirty?
Try a clean record that you know sounds good. If the second record sounds clearer, the original record becomes a stronger suspect.
3. Check the phono/line connection
If the entire system sounds unusually thin, quiet, dull, or otherwise incorrect, verify that the turntable's output and the receiving input are configured correctly.
4. Check cartridge setup
If the cartridge was recently installed, replaced, or adjusted, check the manufacturer's recommended tracking force and alignment where applicable.
5. Check the rest of the system
Speakers, listening position, room acoustics, and placement can all affect perceived clarity.
If every record sounds similar, don't assume the record itself is the problem.
Warm is not the same as muffled
A warm-sounding system may emphasize a smooth, relaxed presentation. That's a matter of sound character.
Muffled sound usually means something has changed or that important detail is being lost.
If your system has always sounded slightly warm but records are clear and detailed, you may simply be hearing the character of the setup.
If records that previously sounded clear suddenly become dull, start troubleshooting.
Don't try to fix a normal warm balance by automatically buying a brighter cartridge. Diagnose the change first.
What If Your Vinyl Sounds Harsh?
Harshness can come from several different parts of the playback chain.
You might hear:
-
Aggressive or strained vocals
-
Excessive sibilance
-
Sharp or splashy cymbals
-
Grainy high frequencies
-
Distortion during loud passages
-
A rough or fuzzy character that becomes more obvious as the record plays
Check these in order
1. Stylus condition
A dirty, worn, or damaged stylus can produce harshness and distortion.
2. Tracking force
If your turntable allows tracking-force adjustment, verify that it is within the manufacturer's specified range.
3. Cartridge alignment
If the cartridge has recently been installed or repositioned, check its alignment where applicable.
4. Anti-skate
If your turntable has adjustable anti-skate, verify the setting according to the manufacturer's guidance. Don't assume that changing anti-skate is the first or only solution.
5. Inner-groove distortion
If the harshness becomes noticeably worse toward the end of a record side, inner-groove tracking deserves special attention.
6. Record condition
If the same harshness occurs at exactly the same point on one record, the record itself may be damaged or have a pressing-related problem.
Use the pattern to find the cause
A useful rule is:
-
Harsh on one record only: inspect the record first.
-
Harsh on many records: check the stylus and setup.
-
Harsh mainly near the center of the record: investigate inner-groove distortion and cartridge/stylus setup.
-
Harshness changes when volume or speaker placement changes: investigate vibration, feedback, or the rest of the audio system.
The goal is not to make vinyl sound artificially bright or soft.
The goal is to find out what changed, when the problem happens, and whether the problem follows the record or the playback system.
What If Your Vinyl Sounds Thin?
A thin-sounding record can be frustrating because the cause is not always obvious.
If the music sounds weak, lacks bass, or seems noticeably less full than expected, check the signal chain before buying a new cartridge, turntable, or amplifier.
One particularly useful clue is volume.
If the sound is both thin and extremely quiet, a phono-stage or connection problem should be one of the first things you investigate.
Start with the phono stage
A phono cartridge produces a very low-level signal that needs the appropriate phono-stage processing before it can be sent to a normal line-level input.
If the phono stage is missing, bypassed, or configured incorrectly, the result can sound:
-
Extremely quiet
-
Thin or weak
-
Lacking bass
-
Difficult to bring to a normal listening volume
Check whether your turntable has a built-in phono preamp and whether its output is set correctly.
As a general rule:
Turntable PHONO output → PHONO input
or
Turntable LINE output → AUX/LINE input
The exact setup depends on your turntable and audio system, so follow the manufacturer's instructions.
Then check the rest of the system
If the phono connection looks correct, check:
-
The correct input is selected.
-
The turntable's PHONO/LINE setting matches the input you are using.
-
A built-in phono stage is not accidentally bypassed when it is required.
-
A built-in phono stage is not being used twice.
-
Speaker connections are secure.
-
Left/right balance controls are centered.
-
Any unusual tone, EQ, or speaker-processing settings are disabled or understood.
Using two phono stages in the same signal path—for example, sending a turntable's LINE output into a dedicated PHONO input—can result in excessive gain and unnatural, distorted sound rather than simply making the system louder.
Thin but not unusually quiet?
If the volume is normal but the sound still feels thin, don't automatically assume the phono stage is the problem.
Compare several records.
If only one record sounds thin, the recording, mastering, pressing, or condition of that record may be responsible.
If every record sounds thin, investigate the entire system, including speakers, connections, placement, and overall system balance.
A thin sound is a reason to trace the signal path—not automatically a reason to buy new equipment.
What If Your Vinyl Has Too Much Crackle?
Some surface noise can occur during vinyl playback, but excessive crackling is not something you should automatically accept as “just part of vinyl.”
The first question is simple:
Does every record crackle, or only this one?
That distinction can quickly narrow down the cause.
If every record is noisy
If several clean records have noticeably more crackle than expected, check the playback environment and the stylus before blaming the records themselves.
Start with:
-
Clean the records properly.
-
Check the stylus for dust or contamination.
-
Keep records and the turntable area as free from dust as practical.
-
Check whether static is contributing to the noise.
-
Review how records are stored and handled.
-
Make sure records are kept in suitable inner sleeves and handled by their edges.
If the problem appears across your entire collection, the stylus, record-care routine, static, or playback environment becomes a stronger suspect.
If only one record is noisy
If several other records play normally, focus on the noisy record.
Check for:
-
Dust or surface contamination
-
Scratches
-
Groove wear
-
Visible damage
-
Warping
-
A pressing-related problem
Clean the record properly and play it again.
If possible, compare another copy of the same record. If the second copy plays cleanly while the original produces the same noise, the evidence points strongly toward the original record.
Listen for the pattern
Not all crackle is equally useful diagnostically.
Random crackle can be associated with dust, contamination, or static.
A pop or click that occurs at exactly the same point every time is more likely to be associated with a physical issue specific to the record, such as a scratch, groove damage, or pressing defect.
This distinction matters because repeatedly cleaning a record will not remove a permanent groove defect.
A useful rule
If every record is noisy, investigate the stylus, cleaning routine, static, storage, and playback environment.
If one record is noisy, inspect the record first.
If the same noise happens at exactly the same point every time, treat it as a record-specific problem until testing shows otherwise.
Vinyl does not have to be perfectly silent to sound good—but excessive noise is still worth diagnosing rather than simply accepting as “normal vinyl sound.”
A 10-Minute Vinyl Troubleshooting Routine

Before buying a new cartridge, phono preamp, or turntable, run through this quick troubleshooting routine.
You may not solve every problem in 10 minutes, but these checks can quickly tell you whether you're dealing with the record, stylus, turntable setup, connections, or the rest of your audio system.
The most important rule is simple:
Change one thing at a time.
That way, you can tell what actually fixed the problem.
Step 1: Play another record
Choose a clean record that you know normally sounds good.
If it sounds good: investigate the original record.
If it also sounds bad: investigate the turntable, setup, connections, or audio system.
This is one of the fastest ways to narrow down the problem.
Step 2: Inspect the stylus
Look for visible dust, contamination, or obvious damage.
If the stylus appears bent, chipped, or otherwise damaged—or you're unsure whether it is safe to use—don't continue playing questionable records through it.
If it simply appears dirty, follow the cartridge or turntable manufacturer's instructions for safe stylus cleaning.
Step 3: Clean the record
If the record is dusty or dirty, clean it using a method intended for vinyl records.
Allow it to dry appropriately after wet cleaning before playing it again.
Then replay the same passage and listen for a change.
Step 4: Check the speed
Confirm that the correct speed is selected for the record, such as 33⅓ or 45 RPM.
If several records consistently sound too fast, too slow, or have unstable pitch, investigate the turntable's speed control rather than assuming the records are the problem.
Step 5: Check the PHONO/LINE configuration
Before changing mechanical adjustments, verify the signal path.
Check:
-
Whether the turntable has a built-in phono preamp
-
Whether its output is set to PHONO or LINE as appropriate
-
Whether the receiving input expects PHONO or LINE
-
Whether another device in the chain is also providing phono-stage processing
The goal is to have the appropriate phono-stage function in the signal path—not none, and not two active phono stages when only one is intended.
Step 6: Check tracking force
If your turntable has adjustable tracking force, confirm that it matches the manufacturer's recommended specification for the cartridge.
Don't use a generic tracking-force number from another turntable or cartridge.
If your turntable uses a factory-set cartridge or tracking force, don't adjust it unless the manufacturer's instructions specifically allow or require it.
Step 7: Check anti-skate
If your turntable has adjustable anti-skate, confirm that it is set according to the manufacturer's recommended setup.
Don't keep turning the control simply because distortion or skipping is still present. Tracking force, stylus condition, alignment, record condition, and turntable stability can produce similar symptoms.
Step 8: Check cartridge alignment
Only investigate cartridge alignment if:
-
Your cartridge is user-adjustable
-
The cartridge was recently installed, replaced, or repositioned
-
The symptoms suggest a tracking/alignment problem
If the cartridge is factory-aligned or not designed for user adjustment, don't move it just to experiment.
Step 9: Check placement
Make sure the turntable is on a stable, level surface and is not exposed to unnecessary vibration.
Where practical, separate it from speakers and subwoofers, particularly at higher listening volumes.
You don't necessarily need expensive isolation accessories. Start with sensible placement and stable support.
Step 10: Compare again
Replay the same record and, if possible, the same musical passage.
Then compare it with the known-good record from Step 1.
Ask:
Does the problem follow the record, or does it follow the playback system?
If the problem follows one particular record, investigate the record.
If several records show the same problem, investigate the stylus, setup, turntable, connections, speakers, or other parts of the system.
And remember:
Change one variable at a time.
Randomly replacing multiple components may make the system more expensive without telling you what was actually wrong.
In many cases, the best first upgrade is not a new piece of equipment. It's a better diagnosis.
If you are still unsure where the problem is coming from, use the AUDURA setup guide as your reference rather than making random adjustments.
A Simple Symptom-to-Fix Checklist
Use this checklist when you want to narrow down a vinyl playback problem quickly.
Start with the first check before changing anything else. Then move to the next step only if the first check doesn't explain the problem.
| Symptom | First check | Next step |
|---|---|---|
| Muffled or dull sound | Stylus and record cleanliness | Check cartridge setup and signal path |
| Harsh vocals or sibilance | Stylus condition and tracking force | Check cartridge alignment where applicable |
| Distortion near the label | Inner-groove tracking, stylus, and record condition | Check alignment and tracking setup |
| Pops and crackle throughout one record | Record cleanliness and condition | Check stylus and static |
| Pops and crackle on many records | Stylus, static, and cleaning/storage routine | Inspect the playback environment and setup |
| One repeating pop or click | Scratch, groove damage, or pressing issue | Compare another copy if possible |
| Thin, very quiet sound | PHONO/LINE and phono-stage setup | Trace the complete signal path |
| Extremely loud or distorted sound | PHONO/LINE and possible double phono-stage processing | Correct the signal path |
| Skipping | Stylus condition, tracking force, record condition, and turntable level | Check anti-skate, dust, vibration, and warping |
| Fast or slow playback | Correct speed selection | If several records are affected, check the turntable's speed system |
| Low-frequency rumble or feedback | Turntable placement and speaker proximity | Reduce vibration and improve support |
| One channel sounds weak | Balance, cables, RCA connections, and cartridge connections | Check alignment and anti-skate if applicable |
| Only one record sounds bad | Record condition | Compare another record and, if possible, another copy |
| Several records sound bad in the same way | Stylus and turntable setup | Check tracking, connections, speakers, and signal path |
The fastest rule to remember
If you only remember one thing from this checklist, remember this:
One bad record → investigate the record.
Several bad records → investigate the playback system.
Then change one variable at a time so you know what actually solved the problem.
Should You Upgrade Your Turntable?
Not necessarily.
One of the most expensive mistakes in vinyl is assuming that poor sound quality always means you need better equipment.
Before spending money, diagnose the problem first.
Does the problem happen with several records, or only one?
If it happens with only one record, the record itself may be the issue. If several records have the same problem, investigate the playback system.
Did the problem appear suddenly?
If so, check the stylus, record, connections, and setup before assuming the turntable needs an upgrade.
Does the problem happen mainly near the center of the record?
Investigate inner-groove distortion, stylus condition, tracking force, and cartridge alignment if your turntable allows adjustment.
Is the sound extremely quiet and thin?
Check the PHONO/LINE configuration and make sure the signal is going through the correct phono stage.
Does the sound change when you increase the volume or move around the turntable?
Investigate vibration, speaker placement, and acoustic feedback.
A properly configured entry-level system can provide enjoyable vinyl playback. A more expensive turntable cannot compensate for a dirty or damaged stylus, a worn or damaged record, incorrect tracking force, or a poorly configured signal chain.
Before buying an upgrade, diagnose the problem first. In many cases, the best improvement costs nothing.
When a Better Turntable or Stylus Actually Makes Sense
Upgrading can make sense—but ideally, it should come after you've ruled out the basic problems.
A new turntable or stylus may be worth considering when your current equipment has a specific limitation that affects the way you listen.
For example, you might consider an upgrade if:
-
Your current stylus is worn and replacement options are limited.
-
Your current cartridge or stylus limits the tracking performance you want.
-
Your turntable lacks an adjustment you genuinely need.
-
You want more flexible connectivity for your current or future system.
-
You want a different stylus profile for a specific tracking or sound goal.
-
You want more consistent speed stability than your current turntable can provide.
-
Your current setup no longer fits your listening environment.
-
You want to move from an all-in-one system to a more flexible, upgradeable setup.
The key is to identify what you want the upgrade to change.
Maybe you need a replacement stylus that is easier to source. Maybe you need a different connection option, more precise speed control, or a cartridge and tonearm combination that gives you more setup flexibility. Or maybe your listening habits have changed and your current all-in-one system no longer fits the way you listen.
In other words, upgrade because you have a specific reason—not simply because a more expensive turntable exists.
The best upgrade is one that solves a problem you can identify.
“More expensive” is not itself a diagnosis.
How AUDURA Approaches Vinyl Sound Quality
For a modern home vinyl setup, simplicity can be an advantage.
AUDURA's approach is built around a simple idea: enjoying vinyl shouldn't require turning your living room into a laboratory.
That doesn't mean setup is irrelevant.
Quite the opposite.
A good vinyl system still depends on a few sensible fundamentals:
-
A stable, level turntable
-
Appropriate tracking force and setup
-
A clean stylus
-
Clean records
-
Correct connections
-
Sensible speaker placement
-
A system that matches the way you actually listen
AUDURA's turntable lineup takes different approaches for different listening spaces and preferences, from all-in-one systems to dedicated turntables with more flexible connectivity and adjustment.
For example, AUDURA Play is designed as an all-in-one vinyl system with integrated stereo speakers. AUDURA Pure is aimed at listeners who want a dedicated turntable that can connect with compatible powered speakers or an existing audio system. AUDURA Core takes a more adjustable approach for listeners who want greater control over setup, including features such as an adjustable counterweight and factory-preset anti-skate.
The important point is not that one approach is universally better than another.
It's that the system should match your room, your equipment, and the way you actually listen.
Good vinyl playback doesn't have to be complicated. It just has to be set up appropriately for the system you're using.
When You Should Stop Troubleshooting
Not every problem needs to become a weekend project.
Stop troubleshooting and contact the manufacturer or a qualified technician if:
-
The stylus appears bent, chipped, or otherwise damaged.
-
The tonearm behaves abnormally or does not move as expected.
-
A cartridge wire has come loose or you are unsure how to reconnect it safely.
-
The platter has unusual mechanical movement, wobble, or resistance.
-
Persistent electrical noise remains after you've checked the connections and signal path.
-
Speed remains unstable after basic speed and setup checks.
-
You cannot confirm the correct tracking-force setting for your cartridge or turntable.
-
You're unsure whether a cartridge is compatible with your tonearm.
When in doubt, don't guess—especially with tracking force, cartridge wiring, or mechanical adjustments.
A good dealer or technician can often identify a mechanical or setup problem much faster than a long series of internet experiments. If your turntable is still under warranty, contact AUDURA Support or an authorized service provider rather than continuing to make uncertain mechanical adjustments.
And if the problem follows one specific record while other records play normally, don't assume your equipment needs repair.
If the record is damaged, worn, or defective, sometimes the most sensible solution is simply to replace the record.
Final Vinyl Sound Quality Checklist
Before you decide that your vinyl record sounds bad—or that your turntable needs an upgrade—work through this checklist.
Record
-
Is the record clean?
-
Is there a visible scratch or other damage?
-
Is it warped?
-
Does the problem happen at exactly the same point every time?
Stylus
-
Is the stylus clean?
-
Does it show signs of wear or damage?
-
Is the cantilever straight?
-
Has playback quality changed recently?
Tonearm
-
Is the tracking force set correctly?
-
Is anti-skate configured according to the manufacturer's guidance, if applicable?
-
Is the cartridge correctly aligned, if alignment is adjustable?
Turntable
-
Is the turntable level and stable?
-
Is the correct speed selected?
-
Is the belt installed correctly, if applicable?
-
Is the turntable protected from strong vibration?
Audio System
-
Is the phono stage configured correctly?
-
Is the turntable set to PHONO or LINE appropriately?
-
Are the RCA connections secure?
-
Are the speakers positioned sensibly?
Comparison
-
Does another known-good record sound normal?
-
Does another copy of the same record sound better?
-
Does the same problem occur on another turntable or playback system?
If you work through these questions in order, most common vinyl sound-quality problems become much easier to narrow down.
The goal isn't to change everything at once. It's to identify what the problem follows—then change one thing at a time.
FAQ
Why does my vinyl record sound bad?
The most common causes include a dirty or damaged record, a dirty or worn stylus, incorrect tracking force, cartridge alignment, anti-skate settings, inner-groove distortion, incorrect speed, an incorrect PHONO/LINE configuration, vibration, or a defective pressing.
The fastest way to narrow down the cause is to compare the suspect record with another known-good record, then change one variable at a time.
Why does my vinyl sound muffled?
Muffled sound can be caused by a dirty stylus, dirty record, incorrect cartridge setup, or a problem in the phono signal path.
Start by cleaning the record and checking the stylus. If several records sound muffled, check the turntable's PHONO/LINE configuration and the rest of the playback setup.
Why does my vinyl sound harsh?
Harsh sound can be associated with tracking problems, a worn or dirty stylus, incorrect tracking force, cartridge alignment, anti-skate setup, or inner-groove distortion.
If the harshness becomes noticeably worse toward the center of the record, check the stylus condition, tracking force, cartridge alignment if adjustable, and the record itself.
Why does my vinyl sound thin and quiet?
Thin, unusually quiet sound often points to a phono-stage or connection problem.
Check whether your turntable has a built-in phono preamp and whether its output is configured correctly. A turntable with LINE output should generally connect to an appropriate AUX/LINE input, while a PHONO output requires a suitable phono stage or PHONO input.
Why does vinyl sound distorted near the end of a record?
This may be inner-groove distortion.
As the stylus moves toward the center of the record, the groove provides less linear distance per revolution, making accurate tracking more demanding. Cartridge alignment, tracking force, stylus condition and profile, and the record's own cutting, mastering, or pressing can all affect how noticeable the distortion becomes.
Can a dirty stylus make vinyl sound bad?
Yes.
Dust and debris on the stylus can interfere with groove tracking and contribute to muffled sound, distortion, and increased noise.
The stylus is delicate, so clean it only with a method appropriate for the specific stylus and cartridge. If the stylus appears bent, chipped, or otherwise damaged, stop playback and seek appropriate advice before using it again.
How do I know if the record or turntable is the problem?
Play several clean, known-good records.
If only one record sounds bad, inspect it for scratches, groove wear, warping, or a pressing defect.
If multiple records show the same problem, investigate the stylus, tracking force, cartridge alignment if applicable, speed, PHONO/LINE configuration, and turntable placement.
Playing the suspect record on another correctly configured turntable or playback system is an even stronger comparison.
Does vinyl always sound worse than digital?
No.
Vinyl and digital are different playback formats with different technical characteristics and listening experiences.
Vinyl can introduce surface noise, physical wear, tracking limitations, and inner-groove distortion. But a properly maintained and correctly configured vinyl system can sound clear, dynamic, and highly enjoyable.
Vinyl's technical limitations are not the same thing as a playback problem. If your records consistently sound distorted, muffled, or unusually thin, don't assume the format itself is responsible. Diagnose the specific problem first.
Conclusion
When someone asks, “Why does my vinyl record sound bad?”, the answer is rarely as simple as “your turntable is bad.”
Vinyl playback is a chain of physical and electrical steps. The record needs to be in good condition. The stylus needs to be clean and healthy, and it needs to track the groove properly. Tracking force needs to be correct, and anti-skate needs to be appropriately configured where applicable. Cartridge alignment can matter. The turntable needs to run at the correct speed and sit on a stable surface. And the signal needs to pass through the correct phono-stage configuration before it reaches your speakers.
The good news is that most of these things are straightforward to check.
Start with the free fixes.
Clean the record. Inspect the stylus. Verify the speed. Check the signal path. Check tracking force and setup. Look at placement. Then compare another record.
Only after you've ruled out those basics should you start thinking about upgrades.
That's one of the best things about learning vinyl: you don't need to understand every piece of hi-fi terminology before you can enjoy the music. You just need to understand enough about your system to recognize when something isn't behaving as it should.
For beginners, AUDURA Turntable Setup Guide is a useful next step if you want to review tonearm setup, tracking force, connections, placement, and first-playback checks.
If you're still building your first system, AUDURA's Vinyl 101 guide collection can help you explore everything from choosing a turntable to understanding how vinyl grooves actually produce sound.
The goal isn't perfect vinyl playback by chasing every possible variable.
It's much simpler:
Clean records. A properly configured turntable. A healthy stylus. A sensible system. And more time listening to the records you love.