Why Does My Turntable Sound Distorted? Causes & Fixes
Introduction
There are few things more frustrating than putting on a record you know well, lowering the stylus, and hearing something that just sounds wrong.
The vocals may sound harsh, cymbals may become brittle or fuzzy, or the entire record may sound muddy and distorted. Sometimes the problem is even more specific: the record sounds fine at the beginning but becomes noticeably worse as the stylus moves toward the center.
If your turntable sounds distorted, don't assume the turntable itself is broken.
Turntable distortion can have several causes, including a dirty or worn stylus, incorrect tracking force, cartridge alignment, a damaged or dirty record, vibration, or an audio connection issue. Many of these problems can be identified with a few simple checks before you consider replacing equipment.
In this guide, we'll walk through the most common causes of distorted turntable sound, how to identify what is actually causing the problem, and which checks you can safely perform yourself.
We'll also explain one of the most confusing types of vinyl distortion: inner-groove distortion, which can become more noticeable as the stylus approaches the center of a record.
If you're new to vinyl, you don't need to understand every part of a tonearm to troubleshoot your system. Start with the simple checks first, change one variable at a time, and move to more advanced adjustments only when necessary.
1. First, Identify What Kind of Distortion You're Hearing
Before changing any settings, pay attention to when and where the distortion happens.
This is one of the fastest ways to narrow down the possible cause—and it can help you avoid making unnecessary adjustments.
Does it happen on every record?
If multiple records sound distorted in similar ways, the problem is more likely to be somewhere in your playback system, such as the stylus, cartridge, tonearm setup, speakers, or audio connections.
For example, if vocals sound harsh on several different records, don't immediately blame the records.
The common factor may be your turntable or audio system.
Does it happen on only one record?
If one record sounds distorted while several others play normally, the record itself becomes a stronger suspect.
Possible causes include:
-
Dirt or contamination in the grooves
-
Groove damage or wear
-
A poorly pressed record
-
Damage concentrated in a particular section
A used record can look surprisingly clean while still having groove damage that becomes obvious during playback.
The easiest test is simple: play a different record and compare the results.
Does the distortion get worse toward the center?
If the beginning of a record sounds clean but later tracks become increasingly harsh, fuzzy, or sibilant, you may be hearing inner-groove distortion.
This happens because the groove's linear speed decreases as it moves closer to the center of the record. The stylus therefore has less physical groove length available to reproduce the same amount of musical information, making accurate tracking more demanding.
Cartridge alignment, stylus condition, and tracking performance can all affect how noticeable inner-groove distortion becomes. Some records are also more difficult to track than others.
If the problem consistently appears near the end of multiple records, inner-groove distortion should move higher on your troubleshooting list.
Does it happen mostly on vocals or cymbals?
Pay particular attention to high-frequency or sibilant sounds, such as:
-
"S" and "T" sounds
-
Vocals with strong sibilance
-
Cymbals and hi-hats
-
Bright guitars
-
Loud, high-frequency passages
These sounds can make tracking problems easier to hear. If they become consistently spitty, fuzzy, or harsh across multiple records, check the stylus condition and tonearm setup before making further adjustments.
A Quick Diagnostic Table
| What you hear | What to check first |
|---|---|
| Distortion on every record | Stylus condition, tracking setup, cartridge alignment, audio connections |
| Distortion on one record | Record condition, groove damage, pressing quality |
| Distortion near the center | Inner-groove distortion, cartridge alignment, stylus condition |
| Fuzzy or harsh vocals | Stylus condition, tracking, alignment |
| Harsh cymbals or hi-hats | Stylus tracking, record condition |
| Sound changes or becomes unstable at higher volume | Vibration, feedback, speaker placement |
| One channel sounds distorted | Cartridge alignment, stylus, cable or channel connection |
| Distortion began suddenly | Stylus condition, cable connection, or a recent setup change |
Don't start adjusting everything at once.
A good troubleshooting process changes one variable at a time. Start with the simplest checks—such as trying another record or inspecting the stylus—before moving on to more advanced setup adjustments.
2. A Dirty Stylus Can Make Your Turntable Sound Distorted
The stylus is the part of your turntable that directly follows the record groove. Because it works in such a small contact area, dust or debris on the stylus can interfere with stable tracking and playback.
Dust Doesn't Look Like Much—but It Matters
A small amount of dust can accumulate around the stylus during normal use.
Even a small buildup can affect how consistently the stylus follows the groove.

You may notice:
-
Muffled or less-clear high frequencies
-
Fuzzy or harsh vocals
-
Intermittent distortion
-
Poor tracking or skipping
A dirty stylus can also contribute to unwanted playback noise. AUDURA's troubleshooting guidance recommends checking the stylus for visible dust or debris when distorted sound occurs.
How to Inspect the Stylus
Turn off the turntable and use good lighting.
Look at the stylus from a safe angle without touching it. You are looking for obvious dust, lint, or other debris—not trying to perform a microscopic inspection.
Never touch the stylus tip or cantilever with your fingers.
If you can clearly see a buildup of dust or lint, cleaning the stylus may improve playback.
If the stylus appears bent, loose, or visibly damaged, stop playback rather than trying to correct the problem through tracking-force or other setup adjustments.
How to Clean a Stylus
Use a stylus brush or cleaning product specifically designed for stylus care.
Follow the cleaning instructions provided for your particular stylus or cartridge. Different stylus assemblies may have different care requirements.
When brushing, follow the direction recommended by the stylus manufacturer.
Avoid aggressive side-to-side movements. The stylus assembly and cantilever are delicate, so this is not a place for improvisation. AUDURA's own setup guidance likewise recommends careful stylus maintenance and model-specific instructions.
Don't Forget the Record
A dirty stylus is sometimes only half of the problem.
If you regularly play dusty or dirty records, debris can collect on the stylus during playback. Keeping both the record and stylus clean helps maintain consistent stylus contact with the groove.
Before playing a record, especially one that has been sitting on a shelf for a while, make sure the playing surface is reasonably clean.
If your stylus becomes visibly dirty again soon after cleaning, check the condition of the records you're playing as well.
3. Incorrect Tracking Force Can Cause Distortion
Tracking force is the downward force that keeps the stylus properly seated in the record groove during playback.
It is one of the most important setup variables on a turntable.
But there is an important misconception:
More tracking force does not automatically mean better tracking.
Lighter is not automatically better, either.
The goal is to use the tracking force recommended for your specific cartridge and stylus.
What Happens When Tracking Force Is Too Low?
If the stylus does not have enough force to stay securely in the groove, tracking can become less stable—especially during loud or demanding passages.
You may notice:
-
Distortion
-
Increased sibilance
-
Harsh or fuzzy vocals
-
Skipping
-
Poor tracking during difficult passages
-
Distortion that becomes more noticeable on later tracks
The important point is that insufficient tracking force can prevent the stylus from maintaining consistent contact with the groove.
What Happens When Tracking Force Is Too High?
Excessive tracking force is also undesirable.
It can increase unnecessary wear on the stylus and records and may prevent the cartridge from operating within its intended performance range.
That's why tracking force should never be guessed.
Use the manufacturer's recommended specification for your specific cartridge and stylus.
AUDURA's setup guidance likewise recommends using the specifications for the specific turntable and cartridge rather than applying a generic tracking-force value.
A Simple Tracking-Force Check
If your turntable has an adjustable tonearm, start by checking the manufacturer's recommended tracking force for your cartridge and stylus.
Make sure the tonearm has been balanced correctly and that the tracking-force setting matches the manufacturer's specification.
If you have a digital tracking-force gauge, you can use it to verify the actual force rather than relying only on the number printed on the counterweight.
Don't copy a tracking-force number from another turntable simply because it uses a similar-looking cartridge.
The correct setting depends on the specific cartridge and stylus.
For a detailed walkthrough of tonearm balancing, tracking force, and anti-skate, see AUDURA's Turntable Tracking Force & Anti-Skate: Beginner's Guide.
Beginner Tip
If you're new to turntables, tracking force can sound intimidating.
It doesn't have to be.
Think of it as finding the amount of force that allows the stylus to stay securely in the groove without applying unnecessary pressure.
Set it according to the manufacturer's specification, verify it when appropriate, and avoid changing it repeatedly while troubleshooting.
Diagnose first. Adjust second.
4. Anti-Skate May Be Affecting Tracking
Anti-skate is another adjustment that can seem mysterious when you're new to vinyl.
On a conventional pivoting tonearm, the interaction between the stylus and record groove creates an inward force that tends to pull the tonearm toward the center of the record.
Anti-skate applies a compensating outward force to help the stylus track the groove more evenly.
Why Does Anti-Skate Matter?
An incorrect anti-skate setting can contribute to uneven tracking and, in some cases, channel-specific distortion.
However, channel-specific distortion can have several possible causes. Don't assume anti-skate is the problem simply because one channel sounds worse than the other.
If your turntable has adjustable anti-skate, start with the manufacturer's recommended setting.
Don't treat anti-skate as a universal number. The appropriate setting depends on the tonearm and cartridge setup, so a setting that works for one turntable may not be appropriate for another.
What If You Don't Have Adjustable Anti-Skate?
Don't worry.
Many turntables are designed with fixed or factory-set tonearm parameters, so there may be nothing for the user to adjust.
If your turntable does not provide an anti-skate adjustment, don't try to invent one or modify the tonearm unnecessarily.
Follow the manufacturer's setup instructions for your specific model instead.
For more detail on anti-skate, tonearm balancing, and tracking force, see AUDURA's Turntable Tracking Force & Anti-Skate: Beginner's Guide.
One Common Mistake
A frequent beginner mistake is changing tracking force and anti-skate repeatedly while listening to the same distorted passage.
That can make troubleshooting more confusing—and make it difficult to tell which adjustment actually helped.
Instead:
Change one setting, play the same section again, and compare.
If the problem doesn't clearly improve, return to the previous setting and investigate another possible cause.
The goal is not to change more settings. The goal is to identify the actual cause.
5. Cartridge Alignment Can Cause Distorted or Harsh Sound
If the stylus is clean, the tracking force is correctly set, and the problem persists across multiple records, cartridge alignment is another area worth considering—particularly if distortion becomes more noticeable toward the inner grooves.
A conventional pivoting tonearm does not move in a perfectly straight line across a record.
As the tonearm travels across the record, the angle between the stylus and groove changes. Proper cartridge alignment helps keep this tracking error within an acceptable range.
What Is Cartridge Alignment?
Alignment involves positioning the cartridge correctly in the headshell or tonearm according to the geometry of the tonearm and cartridge.
Depending on the setup, this can involve:
-
Overhang
-
Offset angle
-
Stylus position
-
Cartridge orientation
The goal is to position the cartridge so the stylus follows the groove as accurately as possible across the record.

Why Can Poor Alignment Cause Distortion?
If the cartridge is not correctly aligned, the stylus may sit at a less-than-ideal angle relative to the groove.
This can become more noticeable with high-frequency material and in the inner grooves, where tracking becomes more demanding.
You may notice:
-
Sibilant vocals
-
Harsh cymbals
-
Grainy or fuzzy high frequencies
-
Distortion that becomes more noticeable toward the center of the record
However, these symptoms do not automatically mean the cartridge needs to be realigned. Inner-groove distortion, stylus condition, tracking force, and record condition can produce similar symptoms.
Don't Adjust the Cartridge Blindly
This is important.
Cartridge alignment is an advanced adjustment.
If your turntable came with a factory-installed cartridge, don't start loosening cartridge screws simply because you hear distortion.
You can easily make the setup worse—or introduce a new alignment problem while trying to fix the original one.
Before considering cartridge alignment, check:
-
Record condition
-
Stylus condition
-
Tracking force
-
Anti-skate, if adjustable
-
Whether the problem occurs on multiple records
If the problem persists after these basic checks, consult the setup instructions for your specific turntable and cartridge before making alignment changes.
If you're uncomfortable performing the adjustment yourself, having a qualified turntable technician or experienced audio shop check the alignment may be the better choice.
When in doubt, don't adjust the cartridge just to see what happens.
6. Inner-Groove Distortion: Why Records Can Sound Worse Near the End
Inner-groove distortion is one of the most confusing types of vinyl distortion because it can make a perfectly functional turntable sound as if something is wrong.
To understand why, think about the difference between the outer and inner parts of a record.
A vinyl record rotates at a constant speed—for example, 33⅓ RPM—but the groove travels a shorter linear distance with each revolution as it moves toward the center.
That means the stylus has less physical groove length available to reproduce the musical information on each revolution.
To understand how the groove carries the musical signal, see How Do Vinyl Records Work?

As a result, accurately tracking complex or high-frequency material can become more demanding in the inner grooves.
What Does Inner-Groove Distortion Sound Like?
You may notice:
-
Harsh or strained vocals
-
"S" sounds becoming spitty or fuzzy
-
Grainy high frequencies
-
Cymbals sounding less clear
-
A loss of detail or clarity
-
Distortion that becomes more noticeable toward the end of a record side
It can be especially noticeable when the inner grooves contain loud, bright, or complex musical passages.
This is one reason a record can sound excellent during its opening tracks but become noticeably harsher as the stylus moves toward the center.
Is Inner-Groove Distortion Always Caused by Your Turntable?
No.
The record itself can be an important part of the equation.
Inner-groove performance can be influenced by factors such as:
-
Mastering decisions
-
Cutting level and groove spacing
-
Record pressing quality
-
Groove wear or damage
-
Stylus condition
-
Cartridge alignment
-
Tracking force
-
Overall playback setup
In other words, hearing distortion near the center of a record does not automatically mean your turntable needs adjustment.
A useful diagnostic test is to compare several records.
If most records play cleanly but one particular album becomes harsh near the end, the record itself may be the stronger suspect.
If the same type of inner-groove distortion appears repeatedly across different records, then stylus condition, tracking, alignment, and other parts of the playback setup deserve closer attention.
Can a Better Stylus Help?
Sometimes.
Different stylus profiles contact the groove in different ways. Some more advanced profiles can trace demanding groove information more accurately, which may help reduce certain types of inner-groove distortion.
But upgrading the stylus should not be your first response.
Correct setup comes first.
A properly installed and correctly tracked stylus can perform better than a more advanced stylus that is poorly aligned or incorrectly adjusted.
Before buying new equipment, make sure the existing stylus is clean and in good condition, the tracking force is correct, and the cartridge is properly aligned if your turntable requires alignment.
A Simple Real-World Test
Choose an album you know well and listen to:
-
The first track
-
A middle track
-
The final track
Then repeat the same comparison with two or three other records.
Ask yourself:
Does the distortion consistently become worse toward the center across multiple records?
If yes, investigate the playback setup—including stylus condition, tracking force, and cartridge alignment.
If the problem appears only on one particular record, inspect the record itself and compare it with another copy or another album before changing your turntable setup.
This simple comparison can help you distinguish a record-specific problem from a playback-system problem—and may save you from buying equipment you don't actually need.
7. The Record Itself May Be the Problem
It's easy to blame the turntable because that's where you hear the problem.
But a vinyl record is a physical medium, and its condition can have a major impact on playback.
If your turntable sounds distorted, don't forget to check the record itself—especially if the problem occurs on only one album or one side.
Check for Visible Damage
Hold the record under a good light and look for obvious problems such as:
-
Deep scratches
-
Heavy scuffs
-
Visible groove damage
-
Dirt or contamination
-
Fingerprints or residue
-
Warping
Not every mark will cause an audible problem, and some groove damage may be difficult to see.
A record can look relatively clean while still having damage that affects playback.
Used Records Can Have Invisible Wear
A record may look beautiful and still have significant groove wear.
For example, a previous owner may have played it repeatedly with a worn stylus or a cartridge that was not tracking correctly.
That kind of groove damage can remain even after the record has been cleaned.
Cleaning can remove dirt, but it cannot repair damaged grooves.
If a used record consistently sounds distorted while other records play normally, the record itself becomes a stronger suspect.
What About a Brand-New Record?
New doesn't always mean perfect.
A new pressing can occasionally have manufacturing or pressing issues that affect playback, including:
-
Non-fill
-
Pressing defects
-
Surface contamination
-
Warping
-
Other manufacturing damage
Not every pressing problem produces distortion, but a defective pressing can sometimes sound noticeably different from other records on the same turntable.
If one brand-new record sounds dramatically worse than several other records, don't assume your turntable suddenly developed a problem.
The Best Test: Play Another Record
This sounds obvious, but it's one of the most useful troubleshooting steps.
Set the problem record aside and play a record that you already know sounds good.
Then compare the results.
If the second record plays normally, you've learned something important.
The problem may be specific to the original record rather than the turntable.
For an even better comparison, try two or three different records.
-
Several records sound distorted: investigate the stylus, tracking, alignment, connections, or other parts of the playback system.
-
Only one record sounds distorted: investigate the record itself before changing your turntable setup.
-
Only one section of a record sounds distorted: inspect that area closely and compare it with another pressing or copy if possible.
This simple test can help you avoid changing perfectly good turntable settings to compensate for a problem that is actually in the record.
8. A Worn or Damaged Stylus Can Cause Distortion
A stylus can wear gradually over time, even when it is kept clean.
It is a mechanical component that repeatedly travels through the record groove during playback. With regular use, the stylus can gradually lose some of its ability to track the groove accurately.
A worn stylus may not suddenly stop working. Instead, you may notice a gradual change in sound quality.
Signs of Stylus Wear
Possible warning signs include:
-
Increasing distortion
-
Harsh or less-clear high frequencies
-
Reduced clarity
-
More frequent skipping
-
Poorer tracking
-
A noticeable change from how your records previously sounded
These symptoms are not proof of stylus wear by themselves. Record condition, tracking force, cartridge alignment, and other setup issues can produce similar problems.
If several records that previously sounded good have gradually become harder to track or more distorted, however, stylus wear is worth investigating.
A Damaged Stylus Is Different From a Worn Stylus
A stylus can also become damaged suddenly.
For example, accidentally dropping the tonearm or handling the cartridge incorrectly can bend the cantilever or damage the stylus assembly.
If distortion appears suddenly after an accident or other physical impact, inspect the stylus before continuing playback.
Look for obvious signs such as:
-
A visibly bent cantilever
-
A stylus that appears loose or displaced
-
Obvious damage to the stylus assembly
If the stylus appears bent, loose, or visibly damaged, stop playback.
Don't try to compensate for a damaged stylus by changing the tracking force or other tonearm settings. Playing records with a damaged stylus can make the problem worse.
If you're unsure whether the stylus is damaged, have it inspected rather than guessing.
How Often Should You Replace a Stylus?
There is no single replacement interval that applies to every stylus.
Stylus service life can vary depending on factors such as:
-
Stylus design
-
Amount of use
-
Record cleanliness
-
Stylus cleanliness
-
Tracking force
-
Cartridge alignment
-
Handling and storage
Rather than replacing a stylus based only on a calendar date, pay attention to manufacturer guidance and changes in playback performance.
If distortion or tracking problems gradually become more noticeable across records that previously played well, it may be time to have the stylus inspected.
And if the stylus is visibly damaged, don't wait for playback quality to deteriorate—stop using it and arrange for an appropriate replacement or inspection.
When in doubt, protect the record first and investigate the stylus before continuing playback.
9. Speaker Placement and Vibration Can Also Create Problems
Not every turntable distortion problem starts with the stylus.
Your speakers and the way your turntable is positioned can also affect playback.
A turntable is a mechanical playback system. The stylus physically follows the groove while the record spins.
If significant vibration from speakers, furniture, floors, or other sources reaches the turntable, that vibration can interfere with the stylus and be amplified through the audio system.
In some cases, this can create acoustic feedback or low-frequency rumble that sounds like distortion.
The Classic Setup Mistake
Imagine this:
Turntable → speaker → turntable
The speaker produces sound.
That sound creates vibration in the air and, depending on the setup, can also transfer vibration through furniture or the floor.

Some of that vibration reaches the turntable.
The stylus can respond to this unwanted mechanical energy, and the system may amplify it.
At moderate volume, the effect may be difficult to notice.
Turn the volume up—especially with bass-heavy music—and the problem can become much more obvious.
If your turntable sounds fine at lower volume but develops unwanted low-frequency noise, howling, or unstable playback at higher volume, vibration and feedback are worth investigating.
How to Improve the Setup
Start with simple changes:
-
Place the turntable on a stable, level surface.
-
Avoid placing the turntable directly on or next to a vibrating speaker cabinet.
-
Give the turntable and speakers as much physical separation as your space allows.
-
Avoid unstable furniture that moves easily when the speakers are playing.
-
Keep the turntable level.
-
Be especially careful with very high playback volume and heavy bass.
If you use a subwoofer, avoid placing it directly underneath the turntable. Low-frequency energy can be particularly difficult for a turntable to isolate from.
Do You Need Expensive Isolation Accessories?
Not necessarily.
Before buying an isolation platform or other accessories, fix the basics first:
Stable surface.
Proper placement.
Speaker separation.
Reasonable playback volume.
These simple changes can solve many vibration-related problems.
If the problem remains after you've optimized the setup, then additional isolation may be worth considering.
Diagnose the source before buying the accessory.
10. Don't Forget the Phono Stage and Audio Connections
If the mechanical side of your turntable checks out, it's time to look at the electrical signal path.
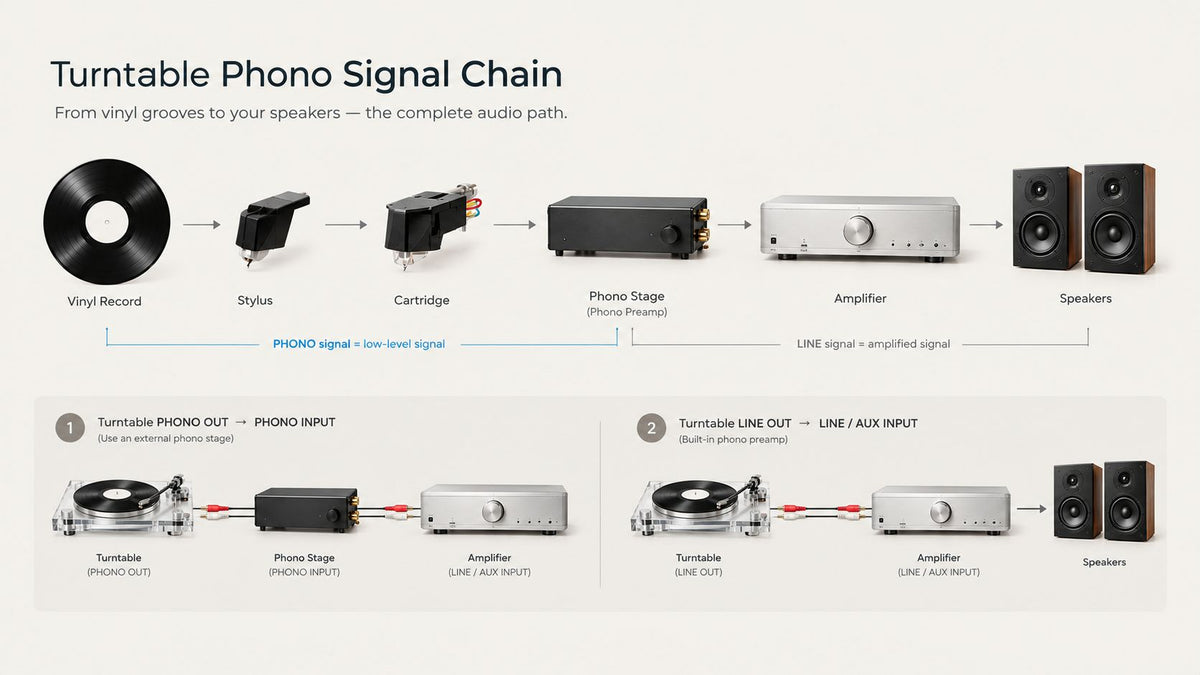
A typical vinyl system can contain several stages:
Record → Stylus → Cartridge → Phono Stage → Amplifier → Speakers

Not every problem in this chain will cause distortion, but an incorrect connection, input setting, or signal level can definitely affect how your turntable sounds.
Check Your PHONO / LINE Setting
One of the most important things to check is the phono stage.
A turntable cartridge produces a low-level phono signal that needs to be processed by a phono preamp before it can be sent to a standard line-level input.
Some turntables have a built-in phono preamp.
Others require an external phono stage.
The important rule is:
Use one phono stage in the signal path—not zero and not two.
For example, if a turntable's built-in phono preamp is active and the resulting LINE-level signal is connected to an amplifier's PHONO input, the signal may be amplified again by a second phono stage.
That can cause excessive gain, distortion, and incorrect frequency response.
If your turntable has a PHONO/LINE switch, make sure the setting matches the input you're using.
For example:
-
Turntable set to LINE → LINE/AUX input
-
Turntable set to PHONO → PHONO input or external phono preamp
Always follow the connection instructions for your specific turntable and audio equipment.
Check the Cables and Inputs
Loose or incorrectly connected cables can also create unusual audio problems.
Check:
-
RCA connections
-
Amplifier or powered-speaker input selection
-
Left and right channel connections
-
Ground connection, if your system uses one
-
Speaker connections
-
Any adapters between the turntable and audio equipment
If only one channel sounds distorted or significantly different from the other, pay particular attention to the left/right signal path.
What If You're Using Bluetooth?
Bluetooth adds another part of the signal path.
If you're troubleshooting distortion over Bluetooth, compare it with a wired connection when possible.
If the wired connection sounds normal but the Bluetooth connection does not, the problem may be occurring somewhere in the wireless connection rather than at the stylus or record.
Bluetooth functions vary by AUDURA model, so always check the specifications and connection instructions for your specific product. AUDURA Play, for example, combines the turntable with built-in stereo speakers and Bluetooth playback, while AUDURA Pure is designed as a dedicated turntable with Bluetooth output and wired RCA connectivity.
Understand Your Signal Path Before Changing Hardware
When troubleshooting turntable distortion, it's tempting to replace a cable, buy a new phono preamp, or upgrade another component immediately.
Don't.
First, identify the actual signal path:
Turntable → output setting → phono stage → amplifier or powered speakers → speakers
Then check that each stage is receiving the type of signal it expects.
Understand the signal path before changing hardware.
A correct connection can solve a problem that might otherwise look like a much more serious turntable fault.
11. Use This Step-by-Step Turntable Distortion Troubleshooting Checklist
If you're standing next to your turntable right now wondering where to start, don't change everything at once.
Work through these checks from the simplest and lowest-risk steps to the more advanced adjustments.
Step 1: Play a Different Record
Choose a record that you already know sounds good.
If the second record plays normally, the original record may be the problem.
If several different records sound distorted in the same way, focus on the turntable and audio system instead.
Step 2: Check the Stylus
Look at the stylus under good lighting.
Check for visible dust, lint, or obvious damage.
If the stylus is dirty, clean it using the method recommended for your specific stylus or cartridge.
If the stylus appears bent, loose, or visibly damaged, stop playback.
Don't try to correct a damaged stylus by changing the tracking force.
Step 3: Identify the Distortion Pattern
Before changing any settings, ask yourself:
-
Does it happen on every record?
-
Only on one record?
-
At the beginning of a side?
-
Mostly near the center?
-
During loud passages?
-
Mainly on vocals or cymbals?
-
In one channel or both?
The location and timing of the distortion are important clues.
They can help you decide which part of the system to investigate next.
Step 4: Check the Record
If the record is visibly dirty, clean it before playing it again.
Look for obvious scratches, groove damage, contamination, or other problems.
Remember that cleaning can remove dirt, but it cannot repair damaged grooves.
If another record plays normally, don't assume the turntable needs adjustment.
Step 5: Check Tracking Force
If your turntable has adjustable tracking force, confirm that it matches the manufacturer's recommendation for your specific cartridge and stylus.
Do not guess.
If you're unsure how to set it correctly, follow the model-specific setup instructions rather than copying a number from another turntable.
Step 6: Check Anti-Skate—If Applicable
If your turntable provides adjustable anti-skate, confirm that it is set according to the manufacturer's instructions.
If your turntable uses a fixed or factory-set system, there may be nothing for you to adjust.
Don't modify the tonearm simply because you can't find an anti-skate control.
Step 7: Check Speaker Placement and Vibration
Make sure the turntable is on a stable, level surface.
Check that speakers are not transferring excessive vibration to the turntable, especially at high volume or with bass-heavy music.
If the distortion or unwanted noise becomes noticeably worse when you increase the volume, vibration and acoustic feedback are worth investigating.
Step 8: Check the Audio Signal Path
Verify:
-
Amplifier or powered-speaker input
-
RCA connections
-
Left and right channels
-
Ground connection, if applicable
-
Bluetooth or other wireless connection, if applicable
Make sure your signal path uses the correct phono-stage configuration.
One phono stage in the signal path—not two.
Step 9: Consider Cartridge Alignment
If the problem persists across multiple records—especially if distortion becomes more noticeable toward the center of the record—cartridge alignment may be worth investigating.
This is an advanced adjustment.
If your turntable came with a factory-installed cartridge, don't loosen the cartridge screws just to experiment.
Follow the setup instructions for your specific model and cartridge. If you're not comfortable performing the adjustment yourself, have the alignment checked by a qualified technician or experienced audio shop.
Step 10: Know When to Stop Adjusting
If the problem persists after the basic checks, don't keep turning random knobs.
At this point, the issue may involve the stylus, cartridge, tonearm, electronics, or another part of the playback system that requires closer inspection.
If you cannot identify what changed or why an adjustment should help, don't make another adjustment just to see what happens.
Have the stylus, cartridge, or turntable professionally inspected when appropriate.
Diagnose first. Adjust second.
The goal isn't to change as many settings as possible.
The goal is to identify the actual cause.
12. What Not to Do When Your Turntable Sounds Distorted
Troubleshooting vinyl can become more confusing when you make several adjustments at the same time.
Before changing hardware or tonearm settings, avoid these common mistakes.
Don't Immediately Buy a New Cartridge
A new cartridge may improve playback in some situations—but only if the cartridge is actually the source of the problem.
If the real issue is a dirty or worn stylus, incorrect tracking force, poor alignment, or a damaged record, replacing the cartridge may not solve anything.
It can also introduce a new setup variable because a new cartridge may require alignment and tracking-force adjustments.
Diagnose the problem before replacing hardware.
Don't Randomly Increase Tracking Force
If the stylus is skipping or sounding distorted, increasing tracking force may sometimes appear to improve tracking.
That does not mean the higher setting is correct.
Too much tracking force can cause unnecessary stylus and record wear and may move the cartridge outside its intended operating range.
Always use the tracking-force specification recommended for your specific cartridge and stylus.
Don't Adjust Anti-Skate by Guesswork
Anti-skate is not a general-purpose fix for distortion.
If your turntable has adjustable anti-skate, use the manufacturer's setup guidance as your starting point.
If your turntable uses a fixed or factory-set system, don't try to modify it simply because you're troubleshooting distortion.
Don't Assume Every Distorted Record Is a Bad Record
A distorted record does not automatically mean the record is defective.
Likewise, a turntable that sounds distorted on one record is not necessarily malfunctioning.
Use comparison to narrow down the cause:
-
Play a different record on your turntable.
-
If possible, play the problem record on another known-good setup.
-
Compare whether the distortion follows the record or stays with the playback system.
Compare first. Assume later.
Don't Clean a Stylus With Whatever Is Nearby
Avoid using household brushes, tissues, fingers, or improvised cleaning methods on the stylus.
The stylus and cantilever are delicate, and aggressive or inappropriate cleaning can cause damage.
Use a stylus-cleaning method recommended for your specific stylus or cartridge, and follow the manufacturer's instructions.
Don't Keep Playing a Visibly Damaged Stylus
If the cantilever appears bent, the stylus looks loose or displaced, or the stylus assembly shows obvious damage, stop playback.
Don't try to compensate by increasing tracking force or changing other tonearm settings.
Have the stylus assessed and replaced or serviced as appropriate before continuing to play your records.
Your records are worth protecting—and sometimes the safest troubleshooting step is knowing when not to make another adjustment.
13. A Simple Comparison: What Should You Fix First?
If you're not sure where to start, use this quick guide to prioritize your troubleshooting.
| Possible cause | Priority | Difficulty | First action |
|---|---|---|---|
| Dirty stylus | High | Easy | Inspect and clean |
| Dirty record | High | Easy | Clean the record |
| Incorrect tracking force | High | Easy–Moderate | Verify the manufacturer's setting |
| Phono/input issue | High | Easy–Moderate | Check the signal path |
| Speaker placement or vibration | Moderate | Easy | Improve placement and stability |
| Record condition or pressing issue | Moderate | Easy to test | Compare with another record |
| Worn stylus | Moderate | Moderate | Inspect the stylus and check replacement options |
| Cartridge alignment | Moderate | Advanced | Check the alignment instructions |
| Anti-skate setting | Moderate | Moderate | Verify the manufacturer's specification |
| Turntable hardware fault | Lower | Advanced | Have the turntable professionally inspected |
This is not a scientific ranking of how likely each problem is.
It's a practical order for troubleshooting: start with checks that are simple, low-risk, and easy to reverse before moving on to more advanced adjustments.
A Good Rule of Thumb
Start with the record and stylus.
Then check the basic setup.
Then check the signal path and vibration.
Only after that should you consider advanced adjustments or hardware problems.
If a problem persists after the basic checks—or if you find a visibly damaged stylus or another component you're not comfortable adjusting—stop troubleshooting and have the equipment properly inspected.
The goal isn't to make the most adjustments.
It's to find the smallest change that identifies and fixes the actual problem.
14. How AUDURA Approaches Easier Vinyl Setup
One reason vinyl can feel intimidating to new listeners is that a traditional system may involve several separate components, connections, and adjustments.
But vinyl doesn't have to be complicated.
At AUDURA, the goal is to make modern vinyl listening easier to live with: thoughtful design, straightforward setup, and systems built around the way people actually listen.
Different AUDURA products take different approaches to that idea.
AUDURA Pure: A Simple Dedicated Turntable
AUDURA Pure is designed for listeners who want a dedicated turntable without unnecessary setup complexity.
It combines a belt-drive turntable with a pre-installed Audio-Technica AT3600L cartridge, a built-in phono preamp, Bluetooth connectivity, RCA output, and switchable PHONO/LINE operation.
The idea is straightforward: give listeners the flexibility of a dedicated turntable while keeping everyday setup simple.
AUDURA Play: An All-in-One Approach
AUDURA Play takes simplicity a step further by combining the turntable and stereo speakers in one system.
It brings together the turntable, Audio-Technica AT3600L cartridge, adjustable counterweight, integrated stereo speakers, and Bluetooth playback in a single setup.
For listeners who don't want to build a separate amplifier-and-speaker system, an all-in-one design can remove several decisions from the process.
AUDURA One: A Complete System With Separate Speakers
AUDURA One takes a different approach.
It combines a belt-drive turntable with dedicated external stereo speakers, along with features such as a built-in RIAA phono preamp, Bluetooth, FM radio, and USB playback.
This gives listeners a complete system while keeping the speakers physically separate—useful for people who want a more traditional speaker arrangement without having to assemble every component themselves.
AUDURA Core: When the Mechanics Are Part of the Experience
AUDURA Core takes another approach entirely.
Instead of hiding the mechanics of the turntable, Core makes them part of the experience.
Its transparent acrylic chassis and platter reveal the belt-drive system in motion, while the carbon fiber tonearm, adjustable tracking force, and conventional cartridge setup give listeners more direct interaction with the mechanical side of vinyl playback.
At the same time, Core is designed for modern listening, with Bluetooth, RCA PHONO/LINE connectivity, optical output, and USB vinyl recording.
The idea isn't to remove every adjustment.
It's to make the parts that matter intentional and understandable.
For some listeners, seeing the platter turn and the tonearm move is part of what makes vinyl enjoyable. Core is designed for that kind of engagement while still fitting into a contemporary audio system.
Different Products, Same Philosophy
These products take different approaches to the same basic idea:
Your vinyl setup should support listening—not become the entire hobby unless you want it to.
Some people genuinely enjoy adjusting cartridges, comparing stylus profiles, experimenting with different components, and learning how the mechanical system works.
Others simply want to put on a record after work and enjoy an album in a comfortable room.
Neither approach is wrong.
The right setup is the one that fits the way you actually listen.
Making vinyl easier doesn't mean removing everything that makes the hobby interesting.
It means removing unnecessary complexity from the parts you don't need—and giving you more control over the parts you do.
15. A Realistic Way to Think About Turntable Sound Quality
It's easy to fall into the idea that every imperfection in vinyl playback requires an upgrade.
It doesn't.
A good vinyl setup isn't necessarily the one with the most expensive cartridge, the heaviest platter, or the longest list of specifications.
A good setup is one where the fundamentals are working together:
-
The record is clean and in good condition.
-
The stylus is clean and in good condition.
-
Tracking force is set correctly.
-
The cartridge is properly aligned when alignment is required.
-
The turntable is stable and level.
-
Speakers aren't transferring excessive vibration back into the turntable.
-
The audio signal path is correctly configured.
Get those fundamentals right first.
Only after you've ruled out the basics should you start asking whether a different cartridge, stylus profile, phono stage, speaker, or turntable would genuinely improve your listening experience.
An equipment upgrade should solve a problem or achieve a specific goal—not simply compensate for a setup issue that could have been fixed another way.
A Better Question to Ask: What Changed?
If your system suddenly starts sounding wrong, don't immediately start shopping for a solution.
Instead, ask:
What changed?
Did you:
-
Move the turntable?
-
Replace or reinstall the cartridge?
-
Clean the record?
-
Drop or mishandle the tonearm?
-
Change speakers?
-
Move the speakers closer to the turntable?
-
Adjust the tracking force?
-
Change inputs or output settings?
-
Start hearing the problem on a new pressing?
The timing can be a valuable clue.
If the distortion appeared immediately after you changed something, that change deserves attention before you start adjusting unrelated parts of the system.
This is one of the simplest principles in turntable troubleshooting:
Don't upgrade around a problem you haven't diagnosed yet.
Find the cause first. Then decide whether anything actually needs to be changed.
FAQ: Turntable Distortion
Why does my turntable sound distorted?
Common causes include a dirty or worn stylus, incorrect tracking force, cartridge alignment, anti-skate settings, a dirty or damaged record, vibration, or an issue in the audio signal path.
Start with the simplest checks: play another record, inspect the stylus, and verify the tracking force before making advanced adjustments.
Why does my vinyl sound distorted near the end of the record?
Distortion that becomes more noticeable as the stylus moves toward the center of a record is often associated with inner-groove distortion.
The record rotates at a constant speed, but the stylus travels a shorter linear distance with each revolution as it moves inward. This can make accurate tracking of high-frequency material more demanding.
Cartridge alignment, stylus condition, tracking force, record mastering, and groove condition can all affect how noticeable the distortion becomes.
Can a dirty stylus cause distortion?
Yes.
Dust and debris can interfere with the stylus's ability to track the groove consistently, potentially causing muffled sound, increased noise, or distortion.
Inspect the stylus under good lighting and clean it using a method recommended for your specific stylus or cartridge.
Can incorrect tracking force cause distorted sound?
Yes.
Tracking force that is too light can make tracking less stable, which may contribute to distortion or skipping.
Excessive tracking force can also cause problems and increase unnecessary stylus and record wear.
Always use the tracking-force specification recommended for your specific cartridge and stylus.
Why does my turntable sound fine on some records but distorted on others?
Not every record presents the same playback conditions.
A particular record may have groove wear, damage, pressing issues, or demanding passages that make distortion more noticeable.
Try several records that you know play well.
If most records sound clean and one consistently sounds distorted, investigate the record before changing your turntable setup.
Why do vocals sound distorted on vinyl?
Harsh or fuzzy vocals—especially exaggerated "S" sounds—can be a sign of tracking difficulty.
Check the stylus condition and basic tonearm setup first. If the distortion becomes more noticeable toward the end of a record side, inner-groove distortion is another possibility.
Can speakers make a turntable sound distorted?
Yes.
Excessive vibration from nearby speakers, furniture, or the floor can reach the turntable and interfere with playback. At higher volumes, this may produce low-frequency rumble or acoustic feedback.
Try increasing the separation between the turntable and speakers and make sure the turntable is on a stable, level surface.
Should I replace my stylus if my turntable sounds distorted?
Not necessarily.
First check whether the stylus is dirty or visibly damaged, whether the tracking force is correct, whether the record is the problem, and whether the distortion occurs across multiple records.
If the stylus is visibly damaged, stop playback. If it is worn or continues to cause tracking problems after proper cleaning and setup, replacement may be appropriate.
Conclusion: Start With the Simple Things
When a turntable sounds distorted, it's tempting to assume that something expensive needs to be replaced.
Usually, that's not the best place to start.
Start with the basics.
Check the record and stylus. Verify the tracking force and tonearm setup. If applicable, check anti-skate and the rest of the audio signal path. Pay attention to when and where the distortion occurs—especially if it becomes worse toward the center of the record or changes with playback volume.
Then make one change at a time.
Vinyl playback is a mechanical process, so small details matter. But that doesn't mean enjoying vinyl has to become complicated.
The goal isn't to build the most complicated system possible.
It's to create a setup that works reliably, fits your space, and lets you put on a record, settle in, and enjoy the music.
If you're still building your first vinyl system, start with our Complete Vinyl Record Player & Turntable Guide for Beginners to understand the equipment and setup choices before you buy.
And if you're looking for a modern vinyl setup designed around everyday listening, explore AUDURA's turntables and vinyl systems.
Because good vinyl listening should leave you thinking about the music—not wondering why the vocals suddenly sound fuzzy.